Integrating your bot into Facebook
2022 wiser me update: Please do not use Facebook if you can. It's fucked. Delete your account.
Last time, we created a simple bot that posted stuff onto our Tumblr account. If you haven't already done the previous tutorial, you can check it out here. If you need the project files to start out with, you can download them by clicking the button below.
This tutorial assumes that you already have a Facebook account. Additionally, please read all terms and conditions before posting to your Facebook. I'm not responsible for any actions Facebook might take.
I don't care about Tumblr, I just want to post to Facebook
If you don't care about Tumblr and only want your bot to post to Facebook, read through the entire tutorial before proceeding. You'll still need to set up Ruby and the folder structure
Where to start
You might remember that we had to create an app when we used Tumblr. It's a little different (and perhaps a bit easier) with Facebook. Assuming you're logged in, visit Facebook's Graph API Console.
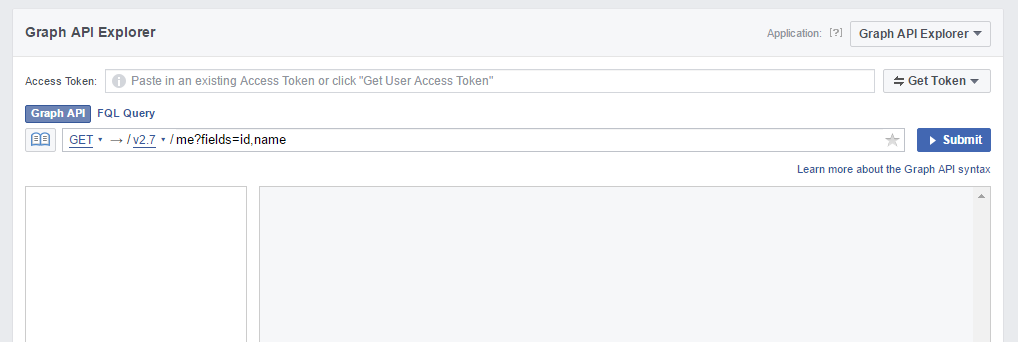
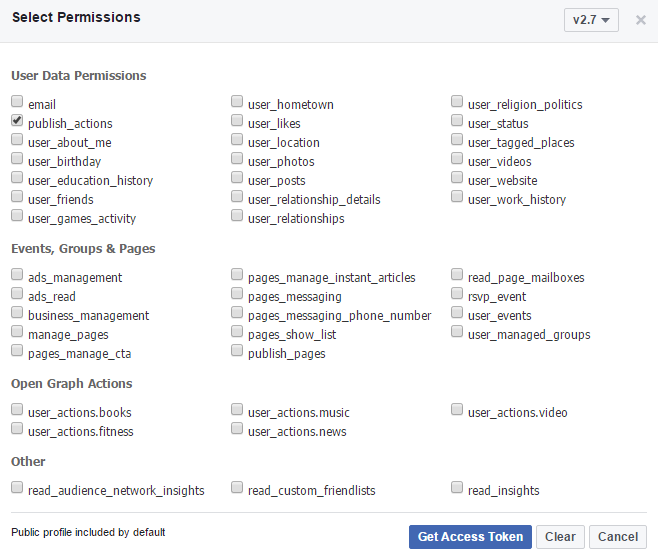
In the top right, we're going to click "Get Token", to get an access token we can use. We should be presented with a checkbox list titled "Select Permissions". Unlike the Tumblr API which grants full access to anything Tumblr with an access token, Facebook requires that you select which permissions you'd like to give your bot.
Right now, all we really want are publish_actions so we can write on our own wall.
Press "Get Access Token" to, well, get your access token. Follow the prompts Facebook gives you, and if all goes well, you should see a long string in the "Access Token" box. Keep this page open - we'll use the token later.
IMPORTANT: Treat this access token like you would the password to your account. We gave permission to publish things to our account, and we don't want someone else to gain that access.
Setting up our Ruby Project
At this point, we're going to open up our project. Remember, if you don't have the files, you can download them here.
Open the root project folder in your favorite text editor, and open your Gemfile file. Right now, it should look like this -
source
As a reminder, our Gemfile specifies what 3rd party packages we need for our app to work. We're going to add a line to integrate with Facebook.
source
Koala is a nice library used to integrate with Facebook. This will do all of the heavy lifting for us.
Integrating Facebook into our Code
Let's go ahead and open our lib/tumblr_bot.rb script. Right now, it should look a little like this - remember the "x" characters in the Tumblr::Client.new block should be replaced with your own keys.
# Authenticate via OAuth
client = Tumblr::Client.new({
:consumer_key => ,
:consumer_secret => ,
:oauth_token => ,
:oauth_token_secret =>
})
alignments = [,
,
,
,
,
,
,
,
]
adjectives = [, , , ]
nouns = [, , , , ]
sentence =
# Make the request
client.text(, title: sentence)
end
We need to add a couple lines to integrate our bot with our Facebook account. Firstly, we need to require 'koala' at the top of our file, just like for the tumblr_client. Next, we're going to input the access token we got on Facebook's site using a method that the koala library provides.
# Authenticate via OAuth
client = Tumblr::Client.new({
:consumer_key => ,
:consumer_secret => ,
:oauth_token => ,
:oauth_token_secret =>
})
# Authenticate to Facebook
# Replace the "x"s here with your own Access Token
facebook = Koala::Facebook::API.new()
alignments = [,
,
,
,
,
,
,
,
]
adjectives = [, , , ]
nouns = [, , , , ]
sentence =
# Make the request
client.text(, title: sentence)
end
Awesome! We are authenticated to Facebook. Now all we have to do is tell koala to post for us. After the penultimate line, we're going to add the code that'll post for us.
facebook.put_wall_post(sentence)
This line is very similar to the line that precedes it. It takes our random sentence and posts it to Facebook. In full, our code will look like this:
# Authenticate via OAuth
client = Tumblr::Client.new({
:consumer_key => ,
:consumer_secret => ,
:oauth_token => ,
:oauth_token_secret =>
})
# Authenticate to Facebook
facebook = Koala::Facebook::API.new()
alignments = [,
,
,
,
,
,
,
,
]
adjectives = [, , , ]
nouns = [, , , , ]
sentence =
# Make the request
client.text(, title: sentence)
facebook.put_wall_post(sentence)
end
Time to test it out. Lets open up a console in our root project folder. Before we run our bot, we need to download the koala library. We included it in our gemfile, but we have to run a command to actually fetch what we need and install it on our computer. Let's do that now.
After this is finished installing, we can test out our bot!
Our bot runs, and tells us it "posted a thing". Lets check our Facebook page. With any luck, we should see something like this -

Cool! Not only that, but we're still posting to our Tumblr account. If you're having trouble getting to this part, you can download the project here. Remember to put in your keys!
Posting to Facebook only
You might want to forgo Tumblr alltogether, and just post to Facebook. We just need to modify our code a little bit to remove the Tumblr functionality.
If we remove this line -
client.text(, title: sentence)
- we will no longer post to Tumblr. However, we can remove some more stuff to clean up our file. Get rid of this entire block.
# Authenticate via OAuth
client = Tumblr::Client.new({
:consumer_key => ,
:consumer_secret => ,
:oauth_token => ,
:oauth_token_secret =>
})
Since we're not using the tumblr_client library anymore, we can remove the require 'tumblr_client' gem from the top of our file. We can also remove the gem 'tumblr_client' line from our Gemfile.
And that's it.
Conclusion
Let me know how this worked out for you, what kind of posts your own bot makes, and what tutorials I can do in the future. This very tutorial was a request, so I'm open to making more!