Creating a simple synthesizer VST plugin in Rust
The Rust Audio ecosystem has evolved a lot since 2018! I recommend checking out Rust Audio on Github, or joining their Discord chat for more info.
Welcome to 2018! A lot happened this past year - the most important of which being the 0.0.1 release of vst on Crates.io.
Preface
If you know what you're looking for (e.g., if you came here from a Google search) and you're antsy to get into code, just go ahead and skip to the bits where we start coding. Or read the notes that I slaved away at writing. Up to you.
Video
A video of this content has been provided. If that's not your thing, you can always follow along with the text below instead.
About
vst is a crate that implements the VST 2.4 specification by Steinberg. VSTs (Virtual Studio Technology) are audio plugins used in a variety of applications. Its basic features are as follows:
- MIDI input and output
- Effects processing
- Audio synthesis
If you're here from a Google search, chances are you already know this. You also probably know of other solutions like JUCE, DPlug, or wdl-ol. If you're thinking "Oh boy! Finally, I can ditch C++ for Rust!" - I like your enthusiasm, but the vst crate isn't quite there yet! It's not much of a framework, and instead just lets you interact with MIDI notes and an audio buffer. It also doesn't have proper UI support yet. But hey, it's 0.0.1 - give us some time.
You may have also stumbled on Joe Clay's excellent post, Writing an Audio Plugin in Rust. Their post and this post are similar, and I'll address that below.
vst2 or vst?
In Joe's aforementioned example, they use overdrivenpotato's vst2 crate. Unfortunately, this repository has been stagnant for quite some time due to having only one contributor.
vst is a fork of the original vst2 source, with a community of developers and maintainers keeping the project active.
TL;DR, you'll want to use the vst crate, and not the vst2 crate. It sounds counterintuitive, but just roll with it.
Disclaimer
I'm not a professional in the DSP field. Some of the stuff I do might not be best practice or the most efficient. However, I hope I'm qualified enough to make a "getting started" tutorial. I hope you think the info I provide is valuable.
What we'll be building
We'll be creating a monophonic white-noise generator. In layman's terms, we're going to create a thing that makes whooooooshhhh noises, and that thing can only make one noise at a time.
Setting up
Let's get started. Set up a new project the same way you would for any other crate. Let's call our VST "whisper", because of the whooshing noises.
cargo new whisper
After that, we need to add our vst dependency, as well as specify that our crate type is "cdylib". It should look like this:
[]
= "whisper"
= "0.1.0"
= ["myname <myemail@example.com>"]
[]
= "0.0.1"
# if you aren't following this tutorial to a T, and a newer version
# has been released, you might wish to get the crate directly
# off of our official Github repository like this:
# vst = { git = "https://github.com/rust-dsp/rust-vst" }
[]
= "whisper"
= ["cdylib"]
Next, lets add some basic boilerplate code to get our minimal VST up and running.
// `vst` uses macros, so we'll need to specify that we're using them!
extern crate vst;
use ;
;
// We're implementing a trait `Plugin` that does all the VST-y stuff for us.
// Make sure you call this, or nothing will happen.
plugin_main!;
If you don't really know what's going on right now, don't worry. Basically, we're implementing the Plugin trait for our Whisper struct. This Plugin trait contains all the info we need to comply with the VST standard in a struct aptly named Info.
Full Info struct options
Right now, we're filling in our Info struct with mostly default options. But there's a lot of stuff we can change to tell our host what our plugin does and expects. We can find full options in the plugin.rs file.
name- The name of our plugin as aStringvendor- The creator (e.g. company) of our plugin as aStringpresets- The number of presets as ani32. We can safely ignore this for now, and if you don't know what a preset is, don't worry.inputs- The number of audio inputs as ani32. This has a default of2(one for the left channel, one for the right). Since we're creating a synthesizer that requires no inputs, we'll set this to0later.outputs- The number of audio outputs as ani32. This again has a default of2. This makes sense for our application which will output stereo audio. If we were building a surround-sound white-noise-ear-blaster, we would want to change this.unique_id- This is required, but kind of pointless.version- pretty self explanatory. This is saved as an i32, but you can still do semantic versioning. For example, a value of0001would be the equivalent of version0.0.0.1.1234would be the equivalent of version1.2.3.4.category- This is an enum that specifies the category of the plugin, which is used in some DAWs. We're making aCategory::Synth, which means we're going to create an output. If we made aCategory::Effect, we might process inputs and modify their buffer.initial_delay,preset_chunks,f64_precision,silent_when_stopped- don't worry about these right now!
Revising our Info
Now that we know a little more about what we want to build, let's revisit our lib.rs file.
// `vst` uses macros, so we'll need to specify that we're using them!
extern crate vst;
# note that we've added the `Category` ;
;
// We're implementing a trait `Plugin` that does all the VST-y stuff for us.
plugin_main!;
Testing our bare-bones plugin
If you're already familiar with VST hosts, and how to load plugins, feel free to skip this part.
We're going to need a way to test our VST plugins. It's not as easy as running cargo run, though, because VSTs are .dlls. They need to be run inside of a VST host. If you use a DAW (Digital Audio Workstation), chances are you already have a VST host. Ableton Live, FL Studio, and Logic are a few popular examples. If you already have a VST host, look in your use manual on how to add VSTs or VST search directories.
If you don't have a VST host, go ahead and use the aptly named VST host. I'm going to be using VST host for all future examples in this tutorial.
Building and loading our plugin
Believe it or not, we already have something we can compile and load into a host. Go ahead and build your project.
cargo build
If all goes well, you should have a successful build. A file named whisper.dll should be present in your target/debug directory. This is our VST file.
Go ahead and open VST Host, and drag our whisper.dll file onto the main window. It should look something like this.
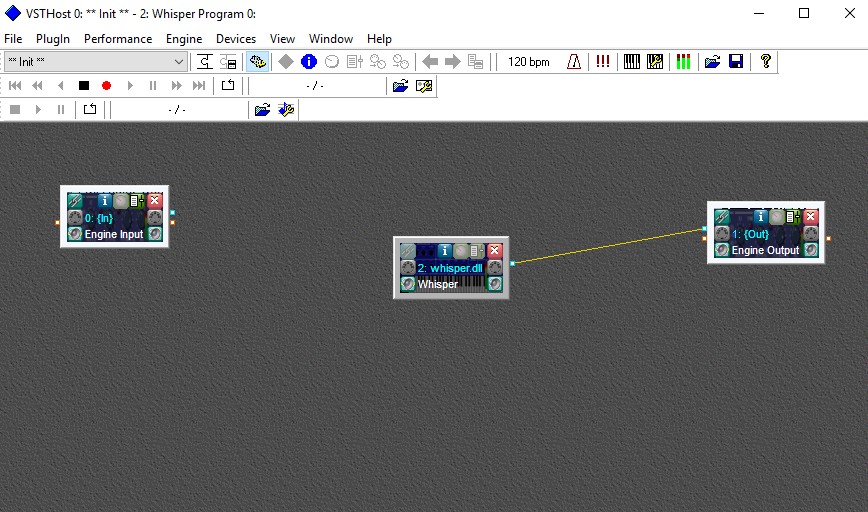
A bit underwhelming? Well, it shouldn't be! You just created your first VST plugin in Rust. It doesn't do anything, but it loads!
Notice in VST Host that a single greenish node connects with the output. This is the (stereo) audio output, like we defined in our Info struct.
Actually doing something
Right now, our plugin does nothing. Let's change that, and create some white noise to fill our audio buffer.
Warning: What we're making can be loud, and right now, it won't be controlled by anything. It'll just be always on, which is a bit unpleasant. Turn your volume down before you forget.
Our Plugin trait has a few other functions - the most notable being process. This is where we'll do a bunch of stuff with our audio buffer.
White noise is another name for random noise. In other words, it's just a bunch of random samples from -1.0 to 1.0. So to achieve white noise, we want to fill our AudioBuffer with, well, random noise.
Let's take a look back at our lib.rs file, and define a new function.
// after our `get_info` function
// ...
// ...
Let's build, compile, and load this new plugin. Prepare your ears for the deafening sound of... nothing. Every sample is 0! We're just outputting silence. Let's fix this.
Note: if you're getting a weird error compiling, make sure you close the plugin in whatever host you have it open in, as the file might not be overwritten due to it being in use.
Adding white noise
Rust doesn't have a random library built in, so we'll need to add another dependency. Let's modify our Cargo.toml file to remedy this.
# ...
[]
= "0.0.1"
= "0.3"
# ...
Now let's modify our main file to add random values from -1.0 to 1.0 to our buffer.
// `vst` uses macros, so we'll need to specify that we're using them!
extern crate vst;
extern crate rand;
use ;
use AudioBuffer;
use random;
;
// We're implementing a trait `Plugin` that does all the VST-y stuff for us.
plugin_main!;
Notice the additional crate and use statement at the top of the file.
You might be wondering what the weird math does.
*output_sample = (random::<f32>() - 0.5f32) * 2f32; looks weird, right? What's with the extra operations?
Well, our random function gives us a number between 0.0 and 1.0, instead of -1.0 and 1.0 like we want. By subtracting 0.5 and then multiplying by 2.0, we can get our desired result.
Performance
This method is poorly optimized, due to calling the random function for every sample. This tutorial won't delve into optimization, but if you want to look at a possible solution, check out this example.
When building other plugins, be sure to test and/or distribute your builds with the --release flag. This turns on certain optimizations that will help your plugin be more performant, at the cost of longer build times.
Adding events
If you build and test your synth now, you'll see that it outputs horrible white noise, all of the time. Most VST instruments respond to MIDI input, e.g. notes on a piano. Instead of having our instrument produce noise all the time, let's make it so it only produces noise when a note is pressed.
Note: If you're using VST Host, you can play MIDI notes by hooking up the MIDI node and playing notes on the keyboard (which can be enabled on the top bar).
Because our instrument is unpitched, we don't care about what note is playing. We just want to make sure sound is playing as long as there is a note being pressed. We can do this quite simply by adding 1 to a counter whenever we receive a note_on event, and subtracting 1 from the counter whenever a note_off event is received.
Note: White noise is unpitched. No matter what note plays, the waveform will look the same. That's not necessarily true for all synthesizers, so keep in mind that the following solution will not be appropriate for all instruments. Our solution is also not very robust and is prone to breaking if our VST Host doesn't perform perfectly. However, it's a good introduction to events.
We're making a big change to the code, but it'll be our last for now. Let's go through the whole thing, and document changes through comments.
extern crate vst;
extern crate rand;
use ;
use AudioBuffer;
use Event;
use Events;
use random;
// We're implementing a trait `Plugin` that does all the VST-y stuff for us.
plugin_main!;
Build and compile our code, and your plugin should work wonderfully. It'll only create the horrible harsh white-noise when a key is being held. We can also mash down a bunch of keys at once without stopping generating sound.
Please again note that this is a very rudimentary system, and it's very specific to our use case.
Takeaways and source code
Hopefully by now you have a rough understanding of how to create VSTs and modify audio buffers in Rust. In the future, I hope to expound on certain subjects, like creating controls or creating effects.
The source code can be found on Github here.
Fixes
If you find an issue with the above code, let me know. The best way is to open an issue on the example repository.
Thanks to:
-
Mathias Lengler for their fix regarding an unnecessary usage of
Cell. -
Adolfo Ochagavía for their insight in adding the
--releaseflag to cargo builds to further optimize code. -
Alex Zywicki for their fix for refactoring the code without the need for an input buffer.
Extra resources
If you're totally sold on building VSTs with Rust, check out the official Rust VST Telegram chat. We're a friendly community who are eager to advise new users and help maintain better code.
If you're coming from something like JUCE and miss the abstraction, check out my rsynth project. It helps abstract a lot of what we did in this tutorial with stuff like voice managers. Note that it's super-alpha-in-development-broken code and needs a lot of work, but at least check out the examples.
Next time
In the future, we'll create more complex applications, like a multi-voice tonal synth with band-limited sawtooth waves. We'll also explore how to create a minimal GUI within Rust VST using your host's built in controls.
Contacting me
You can reach me on Mozilla's Rust IRC at doomy or _doomy. You can also add me on telegram @piedoomy, where I'm most certain to respond.