Creating a very simple sampler audio plugin in JUCE 5+
If you're coming into this new, might I recommend using Rust? The ecosystem for audio plugins in Rust has matured since this article was written. Start off with the Rust Audio group on Github, or check out their Discord to learn more.
I'm pretty new to JUCE, and I'm still learning the ropes of C++. I wanted to create an audio plugin (VST, AU, etc.) for use in DAWs as part of an effort to stop my dependency on Kontakt with my commercial site, Resamplr. Developing custom stuff for Kontakt isn't the best choice since unlicensed instruments require the end user to own the full plugin, which is pretty expensive.
No matter your reasoning, JUCE currently doesn't have great tutorials for this type of stuff. So after a bit of scrounging around on Github and reading API docs, I finally got a working sampler, which is pretty neat! In the steps below I'll detail how and why I did the things I did. I'm very new to this, so if you see a mistake, please point it out!
1. Creating the project
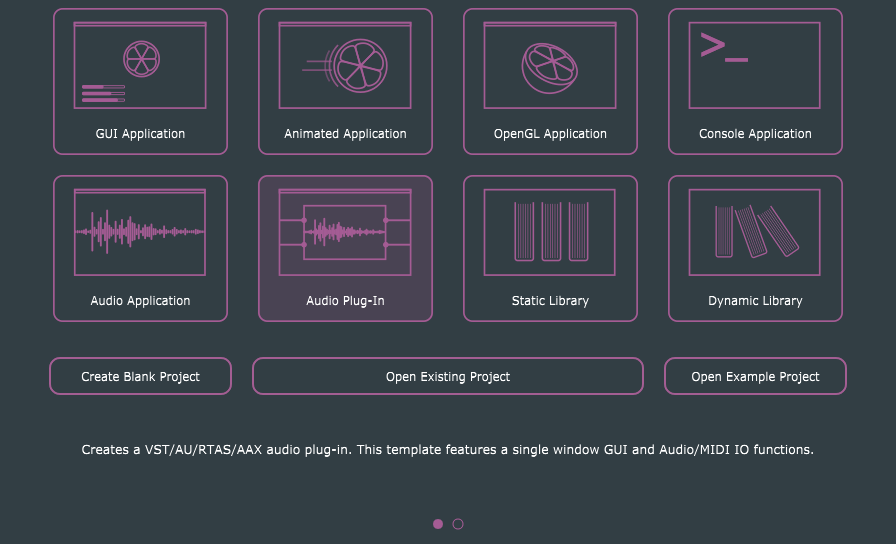
Obviously, the first step is to create a new JUCE project in the Projucer. Although the same concept can be applied to a regular audio application project, we want to select "Audio Plug-In" so we can use our code in a DAW.
Select the location and name of your project, and then create! I'm using Visual Studio 2015 for this project, but any compiler on any system should (in theory) work.
After creating the project, go to settings and make sure "Is a Synth" and "Plugin wants midi input" are checked. Then, save and open in your IDE of choice.
2. Setting up our Synth
Once created, we want to find the PluginProcessor.cpp file located in our project. Find the SimpleSamplerAudioProcessor::processBlock function, and just delete the whole body. We don't need any of that for our simple sampler.
Every sampler made in JUCE has three main components: A Synthesizer, SamplerVoices and SamplerSounds. The Synthesizer class is what JUCE uses to manage an entire instrument, along with SamplerVoices. Sampler voices are just regular voices to any other synthesizer. They allow the Synthesizer to play multiple notes at once. Lastly, the SamplerSound just contains sample data.
Go ahead and create a new Synthesizer class from the Projucer. We're going to name the files SimpleSynth.h and SimpleSynth.cpp. Let's take a look at what should go in both of these files, and then explain the reasoning behind it.
// SimpleSynth.h
class SimpleSynth : public Synthesiser ;
Note: If you're not using Windows, you may not see
#pragma once, but something similar in function.
First, we include the necessary JUCE headers. Then, we create a new class SimpleSynth which inherits from the Synthesiser class we were talking about earlier. (Take note that JUCE spells it Synthesiser and not Synthesizer). We define a very simple setup method, and prepare for an AudioFormatManager object.
The AudioFormatManager is the object that will find our sampled file, determine the best way to decode it, and then store the file as data. We'll get further into this with the actual .cpp code.
// SimpleSynth.cpp
void SimpleSynth::
There's a lot to take in here, but it's fairly simple (and also most of the code we're going to write!) First, we include our header file. Then we define MAX_VOICES to 16. This is the number of samples that can be played at one time. You can change it to any number you desire.
In our setup method, we use a simple loop to add 16 new voices to our Synthesizer. Next, we tell our aforementioned AudioFormatManager class to register basic formats. This is a convenience method that ships with JUCE that just tells the manager that it can read .WAV and .AIFF files.
Next, we create a File pointer that contains the relative path to our sample in question. In a professional application, we probably wouldn't hard-code the filename in like this, or do so with no error checking, but it's fine for our purposes. My file is simply file.wav, but name your file appropriately depending on the sample you have provided.
As a side note, the file path is relative to the compiled project. In my case, I dropped file.wav in ...projectname\Builds\VisualStudio2015\x64\Debug\VST\file.wav.
After this, we create a file reader to pass into our new sound.
As for the last 3 lines, the addSound documentation is much more descriptive and helpful than I could hope to detail here, so read that to learn more! It should show up in your IDE when you begin to type it out.
3. Finishing Touches
We need a few more lines to make our synth playable. In our generated PluginProcessor.h file, add the following after the private declaration:
SimpleSynth synth;
Here we're just creating a private variable of our synth class to use in the main code.
Open up PluginProcessor.cpp, and add the following in our blank processBlock method:
synth.;
We're just passing in some local variables to the Synth object. It handles everything we need to render our audio!
Finally, add the following line to prepareToPlay:
synth.;
This tells our Synth what our sample rate is currently, and prepares it for being played.
4. Testing
That's actually it. Build the project, and run in the host of your choice. I like JUCE's Plug-In Host, but you can use whatever you like. The plugin should now play back samples and pitch them according to MIDI data.
If your plugin crashes, you most likely have the file in the wrong spot. Double check that you have the file alongside your audio plugin binary.
If your plugin doesn't make any noise, make sure you added the setCurrentPlaybackSampleRate detailed at the end of step #3.